Last updated: June 18, 2026
Quick Answer: A garage door that closes and then immediately reopens is almost always triggered by the safety photo-eye sensors detecting a real or perceived obstruction. The most common causes are misaligned sensors, dirty lenses, damaged wiring, or sunlight interference. In most cases, a homeowner can diagnose and fix the problem in under 30 minutes without any special tools.
Key Takeaways
- The two small sensors near the bottom of your garage door tracks are the first thing to check when a door closes then reverses.
- A steady LED on both sensors means they are aligned and communicating; a blinking or off LED points directly to the problem.
- Dirty lenses, knocked brackets, pinched wiring, and direct sunlight are the four most common causes of sensor faults.
- Chamberlain’s June 2026 diagnostic guidance confirms that wiring errors at the terminal block are a frequently overlooked cause of repeated reversals.
- Sensor replacement costs roughly $30 to $75 CAD for parts on most residential systems, with professional labor adding $80 to $150 CAD depending on the service provider.
- Weather and temperature extremes, common in Ontario, can cause intermittent sensor faults that are easy to misread as mechanical failures.
- Newer garage door systems are not automatically more reliable than older ones; sensor quality varies significantly by brand and installation quality.
- Skipping the sensor check and jumping straight to travel or force adjustments is the most common DIY mistake, and it can make the problem worse.
- If both sensor LEDs are steady and the door still reverses, the issue may be mechanical, such as a spring imbalance or track obstruction, rather than sensor-related.
- A door that reverses unexpectedly is a safety feature working as intended; never disable or bypass sensors to force the door closed.
What Causes a Garage Door to Close Then Immediately Open Again
A garage door that closes and then immediately reopens is responding to a signal from its safety photo-eye sensors, which have detected a break in their infrared beam. According to a February 2026 article by Local Garage Doors, sensor-related issues account for the majority of complaints where a door fully descends and then immediately reverses to the open position. The door is not malfunctioning; it is doing exactly what it was designed to do.
The photo-eye system works by sending a continuous infrared beam across the door opening, about four to six inches above the floor. If that beam is interrupted while the door is moving, the opener reverses the door. The problem is that the beam can be interrupted by things that are not obvious: a spider web, a thin layer of grime on a lens, or a sensor bracket that has shifted by just a few millimeters.
The most common root causes, ranked by frequency:
- Misaligned sensors (brackets knocked out of position by foot traffic, a car bumper, or a broom)
- Dirty or fogged lenses (dust, grease, or condensation blocking the beam)
- Sunlight interference (direct sun overwhelming the receiver sensor)
- Damaged or pinched wiring (stapled too tightly, chewed by pests, or corroded)
- Wiring errors at the terminal block (white wire on wrong terminal)
- An actual obstruction in the beam path (a garden tool, a piece of cardboard, debris)
Clopay, one of the largest residential door manufacturers, states that a door closing and immediately reopening is “often” caused by the safety sensors detecting an obstruction or thinking they do, even if nothing obvious is visible. Their recommended starting point is always the sensors before touching any travel or force settings.
For a broader look at reversal behavior that occurs before the door reaches the floor, see this related guide on why your garage door reverses before closing and how to fix it.
What Do Garage Door Sensors Actually Do to Prevent Accidents
Garage door safety sensors, also called photo-eyes, are mandatory safety devices on all residential garage door openers sold in North America. They exist to prevent the door from closing on a person, pet, or object. UL Solutions and industry commentators continued to emphasize UL 325 safety requirements in 2024 and 2025 updates, reaffirming that entrapment protection devices such as photo-eyes are mandatory on residential openers and must reverse the door on obstruction.
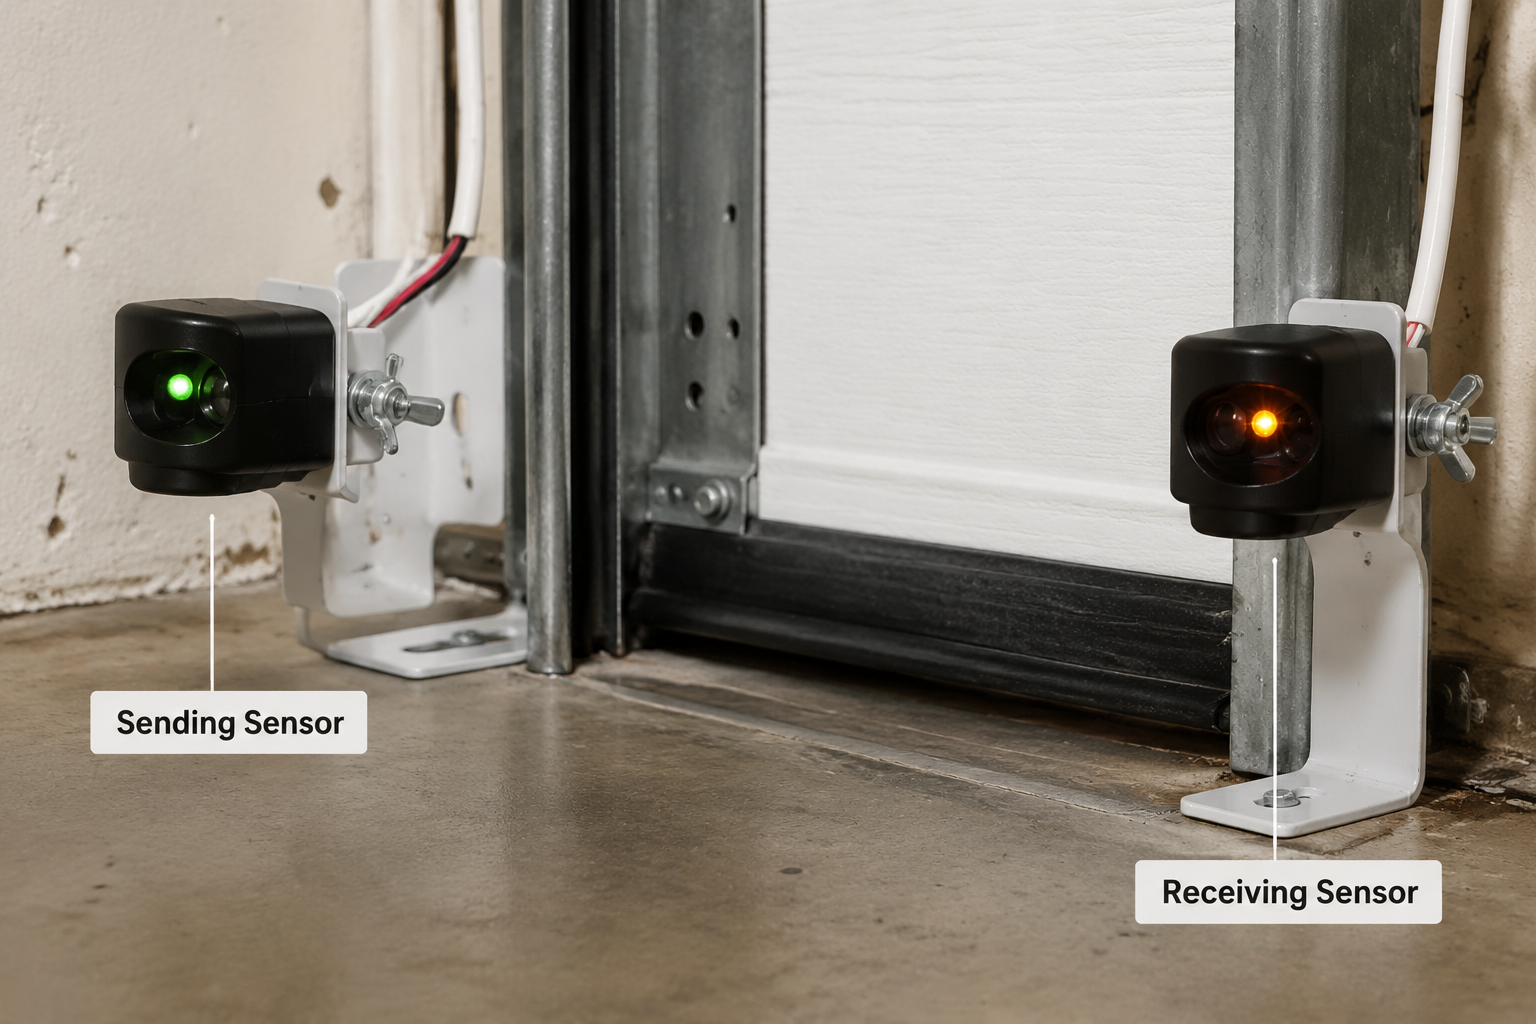
Each sensor unit contains either an infrared transmitter (the sending sensor) or a receiver (the receiving sensor). The sending sensor, typically marked with an amber LED, projects a constant invisible beam. The receiving sensor, typically marked with a green LED, monitors that beam. The moment the beam is broken while the door is in motion, the opener immediately reverses.
Chamberlain’s April 2026 updated guidance clarifies an important distinction: the opener is designed to respond to a broken beam only while the door is moving, not when it is idle. So if the beam is blocked before you press the button, the door simply will not start closing. If the beam is broken mid-travel, the door reverses. Understanding this distinction helps separate a true sensor problem from a logic or control board issue.
What the LED colors mean:
| LED State | What It Indicates |
|---|---|
| Both LEDs solid (green and amber) | Sensors aligned, beam intact, system ready |
| Receiving sensor (green) blinking | Misalignment or obstruction blocking the beam |
| Receiving sensor (green) off | Power loss, wiring fault, or failed sensor |
| Sending sensor (amber) blinking | Wiring issue or sensor fault on transmitter side |
| Either LED dim or flickering | Marginal alignment or intermittent wiring contact |
How to Fix a Garage Door Sensor That Keeps Reversing: Step-by-Step
Most sensor problems can be resolved by following a structured five-step process. Cunningham Door and Window published a sensor-repair guide in March 2026 that standardizes exactly this approach: check LED lights, clean lenses, realign sensors, inspect wiring, and then test the door.
Step 1: Check the LED indicators Stand at the opener and look at both sensor units. Both LEDs should be solid. A blinking or off LED tells you exactly where to focus. If the green receiving sensor is blinking, start with alignment. If it is off entirely, start with wiring.
Step 2: Clear the beam path Walk the full width of the door opening at floor level. Remove any object, tool, bag, or debris that could interrupt the beam. Even a thin broom handle leaning against the wall can break the signal.
Step 3: Clean the lenses Use a dry microfiber cloth or a cotton swab to wipe both sensor lenses. Grease, dust, and condensation are common in garages, and a thin film on the lens can scatter the infrared beam enough to cause a fault. Do not use glass cleaner with ammonia, as it can leave a residue.
Step 4: Realign the sensors Each sensor is mounted on a bracket with a wingnut or a small bolt. Loosen the fastener slightly, then gently move the sensor until the LED becomes solid. Lions Gate Garage Doors (February 2026) recommends slowly “wiggling” the sensor while watching the LED, then tightening the fastener once the light is steady. Both sensors must point directly at each other.
Step 5: Inspect the wiring Follow the wiring from each sensor up to the opener unit. Look for pinched sections, staples driven through the wire, frayed insulation, or loose terminal connections. Chamberlain’s June 2026 diagnostic guide specifies that white wires should connect to the white terminal and white/black wires to the gray/black terminal. A reversed or loose connection at the terminal block is a frequently overlooked cause of repeated reversals.
Step 6: Test the door Press the close button and watch the door travel fully to the floor. Then place a 2×4 flat on the ground under the door and close it again. The door should reverse when it contacts the board. If it does not reverse on contact, the auto-reverse mechanical setting also needs adjustment, and a technician should be called.
If the door still reverses after all six steps, the sensors themselves may have failed. Bench-test them by temporarily wiring them directly to the opener and pointing them at each other. If the LEDs still do not come on, the sensors need replacement. If they do come on, the problem is in the field wiring run between the sensors and the opener.
For professional opener diagnosis and repair, see garage door opener repair in Oakville.
Are There Common Reasons Garage Door Safety Sensors Malfunction
Yes, and most of them are environmental or installation-related rather than product defects. Quality Overhead Door’s 2025 safety article identifies a broken or misaligned safety sensor as “one of the most common reasons” a garage door refuses to close or reverses after closure.
The most frequently seen malfunction causes:
- Physical impact: A car bumper, bicycle handlebar, or foot kick can shift a sensor bracket by just enough to break alignment without visibly damaging it.
- Vibration over time: The repeated vibration of the door opening and closing can gradually loosen sensor bracket hardware, causing slow drift out of alignment.
- Condensation and moisture: In Ontario’s climate, morning condensation can form on sensor lenses, causing intermittent faults that clear up by mid-morning and are hard to reproduce.
- Pest activity: Spiders frequently build webs directly across sensor lenses or in the beam path, triggering false obstruction signals.
- Wiring degradation: Older wiring insulation can crack and cause intermittent shorts, particularly in unheated garages where temperature swings are extreme.
- Power fluctuations: A loose wire at the terminal block can cause the sensor to lose power briefly during door travel, triggering a reversal.
Do Temperature or Weather Affect Garage Door Sensor Performance
Yes, weather is a significant and underappreciated cause of intermittent sensor faults, particularly in climates with cold winters and humid summers. Lee Company’s late-2025 troubleshooting guide highlights sunlight interference and moisture as increasingly common causes of intermittent sensor faults, particularly in newer neighborhoods with south-facing garages.
Direct sunlight is the most disruptive weather factor. When the sun is low in the morning or late afternoon, it can shine directly into the receiving sensor’s lens, overwhelming it with infrared light and causing the opener to interpret the situation as a blocked beam. This produces reversals that seem random and are difficult to diagnose because they only happen at certain times of day.
Weather-related causes and fixes:
- Direct sunlight: Attach a small cardboard shade or a piece of foam to the sensor bracket to block the sun’s angle. Some technicians slightly reposition the sensor downward to avoid the sun’s path.
- Condensation: Wipe lenses in the morning. If condensation is chronic, a small silicone gasket around the lens housing can reduce moisture buildup.
- Extreme cold: Metal brackets contract in cold weather, which can shift alignment slightly. Check sensor alignment each fall as part of a seasonal tune-up.
- Ice and snow: Snow or ice accumulating near the sensor base can physically block the beam. Clear the sensor area after each snowfall.
For homes near water, such as lakefront properties in the Bronte area, humidity and salt air add an additional layer of sensor wear. See Bronte garage door installation and lakefront home considerations for environment-specific guidance.
Can I Troubleshoot Garage Door Sensor Problems Myself
Most sensor troubleshooting is safe and straightforward for a homeowner to handle. The tools required are minimal, the risk is low, and the majority of sensor faults are resolved without any replacement parts.
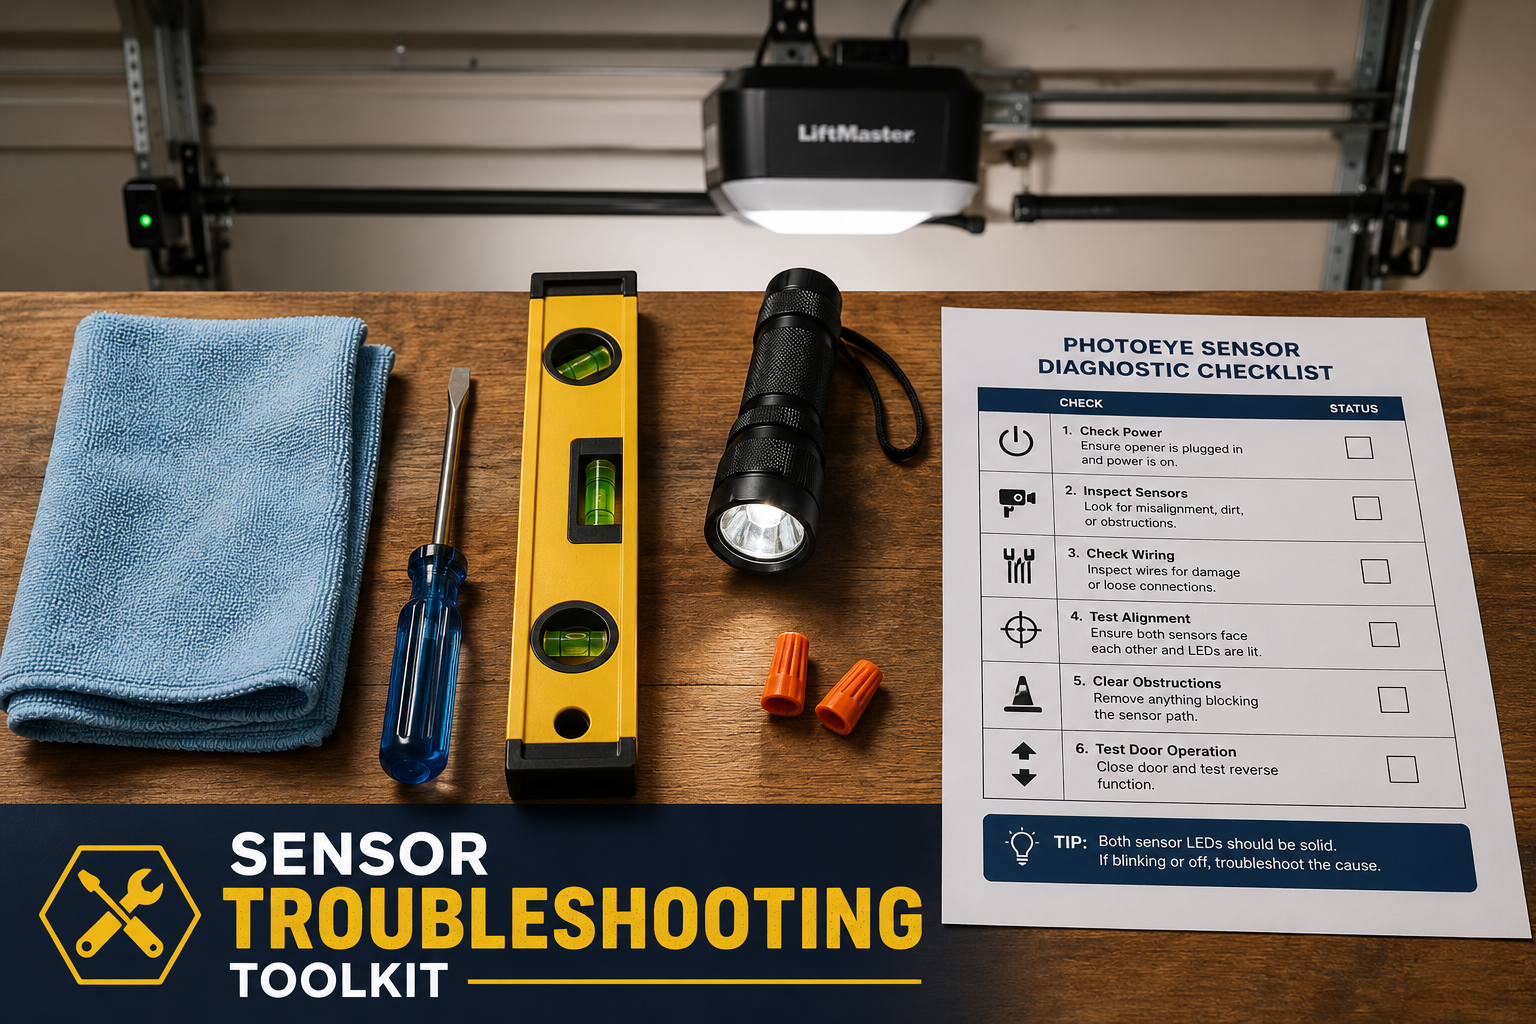
Tools needed for a basic sensor diagnosis:
- Microfiber cloth or cotton swabs (lens cleaning)
- Flathead and Phillips screwdrivers (bracket adjustment)
- A small level (confirming bracket angle)
- A flashlight (inspecting wiring in dark corners)
- A multimeter (optional, for testing voltage at sensor terminals)
When to call a professional instead:
- The wiring is visibly damaged, chewed, or corroded along a significant length
- The sensors have been physically broken or cracked
- The door still reverses after all alignment and cleaning steps
- The opener’s logic board may be involved (multiple unexplained behaviors)
- The door is also making grinding noises or moving unevenly, which suggests a mechanical issue such as a spring or cable problem
For issues that go beyond sensors, a garage door tune-up covers a full mechanical inspection that includes sensor testing, spring tension, and hardware tightening.
How Much Does It Cost to Repair Garage Door Sensor Issues
Sensor repair costs range from nothing (a free DIY cleaning and realignment) to a few hundred dollars for a full sensor replacement with professional labor. Quality Overhead Door estimated replacement sensors at around $30 USD for typical residential systems as of late 2025, which translates to roughly $40 to $75 CAD depending on the brand and supplier.
Cost breakdown by repair type:
| Repair Type | DIY Cost | Professional Cost (CAD) |
|---|---|---|
| Lens cleaning and realignment | $0 | $80 to $120 (service call) |
| Sensor bracket replacement | $10 to $20 (parts) | $100 to $150 |
| Full sensor pair replacement | $40 to $75 (parts) | $130 to $220 |
| Wiring repair (short run) | $5 to $15 (wire, connectors) | $120 to $180 |
| Wiring replacement (full run) | $15 to $30 (parts) | $150 to $250 |
Note: These are estimates based on typical residential service pricing in Southern Ontario as of mid-2026. Actual costs vary by service provider, accessibility, and opener brand. Always request an itemized quote before approving work. For help reading a service quote, see how to read a garage door quote: 9 line items explained.
Are Sensor Problems Worse in Old or New Garage Door Systems
Neither old nor new systems are immune to sensor problems, but the failure modes differ. Older systems (pre-2010) often have wiring that has degraded over time, and replacement sensors may be harder to source. Newer systems have more sensitive electronics that can be affected by radio frequency interference and smart-home integration issues.
Old systems (10+ years):
- Wiring insulation is more likely to be brittle or cracked
- Sensor brackets may be bent or corroded
- Replacement parts are available but may require brand-specific sourcing
- Force and travel settings may have drifted, compounding sensor issues
New systems (under 5 years):
- More sensitive receivers can be disrupted by LED lighting in the garage
- Wi-Fi and smart-home connectivity can introduce software-related false signals
- Sensors are generally more accurate but also less tolerant of marginal alignment
- Warranty coverage typically applies, so a manufacturer support call is worth making first
The brand of the opener matters more than the age. Chamberlain, LiftMaster, and Genie have well-documented sensor diagnostics and widely available replacement parts. Less common brands may require proprietary sensors that are harder to find and more expensive.
Which Garage Door Brands Have the Most Reliable Safety Sensors
Chamberlain and its commercial brand LiftMaster consistently receive high marks for sensor reliability and diagnostic clarity. Their June 2026 updated support procedure provides a detailed step-by-step diagnostic that distinguishes between misalignment, bad sensors, and shorted wires, which is more thorough than most competitors offer.
Brand comparison summary:
- Chamberlain / LiftMaster: Strong diagnostic documentation, widely available sensors, clear LED indicators, good warranty support.
- Genie: Reliable sensors with straightforward alignment; replacement parts are widely stocked at hardware stores.
- Craftsman: Generally solid performance; sensors are often sourced from Chamberlain, so compatibility is good.
- Ryobi: Budget-friendly but sensor quality is more variable; less documentation available for advanced troubleshooting.
- Marantec: Less common in Canada; sensors work well but sourcing replacements can take longer.
Regardless of brand, sensor reliability depends heavily on installation quality. A premium sensor installed at the wrong height or with loose wiring will fail faster than a budget sensor installed correctly.
What Are the Most Common Mistakes People Make with Garage Door Sensors
The single biggest mistake is skipping the sensor check and going straight to adjusting the travel or force limits on the opener. Force adjustments tell the door how hard to push before reversing; increasing force to overcome a sensor fault does not fix the sensor and can create a genuinely dangerous door that does not reverse when it should.
Other common mistakes:
- Bypassing sensors entirely: Holding down the wall button to force the door closed overrides the sensor signal temporarily. This is a diagnostic tool, not a solution. Never make it a habit.
- Cleaning lenses with the wrong product: Ammonia-based cleaners can leave a film that scatters infrared light. Use a dry cloth or water only.
- Overtightening the bracket wingnut: Tightening too hard after alignment can shift the sensor slightly. Snug is enough.
- Ignoring the wiring: Most DIY guides focus on alignment and miss wiring issues, which are the second most common cause of persistent faults.
- Replacing sensors before testing wiring: If the wiring run is faulty, a new sensor will fail just as quickly. Always bench-test the sensor directly at the opener before concluding the sensor is bad.
- Assuming the problem is always sensors: If both LEDs are solid and the door still reverses, the cause may be a spring imbalance, a bent track, or a mechanical obstruction. A broken garage door spring can cause the door to feel resistance and trigger the auto-reverse even when sensors are working correctly.
How Do I Know If My Garage Door Sensors Need Replacement
Sensors need replacement when they fail the bench test described above: wired directly to the opener, pointed at each other, and the LEDs still do not come on. Other indicators include a cracked or shattered lens housing, visible corrosion on the terminals, or a sensor that has been physically snapped off its bracket.
Signs that point to replacement rather than repair:
- LED does not illuminate under any alignment condition, even when sensors are held directly facing each other
- Lens housing is cracked, yellowed, or physically damaged
- Terminal pins are corroded and do not make clean contact
- The sensor has been submerged in water (flooding event)
- Wiring pigtail at the sensor is frayed to the point where it cannot be safely spliced
Sensors that are simply old but still functioning do not need replacement. If both LEDs are solid and the door operates correctly, the sensors are doing their job regardless of age.
Are Garage Door Sensor Issues Dangerous or Just Annoying
A malfunctioning sensor that causes a door to reverse is actually the safety system working correctly, so in that sense the behavior itself is not dangerous. The danger arises when homeowners respond to the inconvenience by bypassing or disabling the sensors. A garage door descending without functional photo-eyes is a serious entrapment hazard, particularly for children and pets.
UL 325 requirements, which govern residential garage door opener safety in North America, mandate that entrapment protection devices must reverse the door on obstruction. These requirements exist because garage doors are among the heaviest moving objects in a typical home, with residential doors weighing between 130 and 350 pounds depending on size and material.
The practical risk summary:
- A door that reverses due to a sensor fault: inconvenient, not dangerous
- A door with disabled or bypassed sensors: genuinely dangerous
- A door that does not reverse when it contacts an object: requires immediate service
If the door is behaving erratically and the cause is unclear, contact a professional rather than experimenting with force or travel adjustments. For urgent situations, emergency garage door repair in Oakville offers same-day response.
FAQ: Why Your Garage Door Closes Then Reopens (Sensor Troubleshooting Guide)
Q: Why does my garage door close all the way and then immediately go back up? A: This is almost always caused by the photo-eye sensors detecting a break in their infrared beam at the moment the door reaches the floor. The most likely causes are misaligned sensors, dirty lenses, or an object in the beam path. Check both sensor LEDs first.
Q: Can I close my garage door if the sensors are broken? A: You can hold down the wall button continuously to override the sensors temporarily, but this should only be done to confirm the sensor is the problem, not as a regular workaround. Operating a door without functional sensors is unsafe and may violate local building codes.
Q: How do I know which sensor is the problem, the sending or receiving one? A: The sending sensor (amber LED) rarely fails on its own. If the amber LED is off or blinking, check the wiring at that sensor first. If the green receiving sensor is blinking or off, start with alignment. Chamberlain’s June 2026 guide recommends bench-testing both sensors directly at the opener to isolate the fault.
Q: My sensors look perfectly aligned but the door still reverses. What else could it be? A: If both LEDs are solid and the door still reverses, the problem is likely mechanical rather than sensor-related. Check for a spring imbalance, a bent track section, or an object on the floor that the door is physically contacting. A misadjusted travel limit can also cause this.
Q: How often should garage door sensors be cleaned? A: Wiping the lenses with a dry cloth every three to six months is a reasonable maintenance schedule for most garages. Garages with heavy dust, woodworking activity, or pest activity may need monthly cleaning.
Q: Does sunlight really cause garage door sensors to malfunction? A: Yes. Direct sunlight can overwhelm the infrared receiver, causing it to interpret the bright light as a blocked beam. This typically happens in the morning or late afternoon when the sun is at a low angle. A small cardboard or foam shade attached to the sensor bracket usually resolves it.
Q: How long do garage door sensors typically last? A: Most photo-eye sensors last 10 to 15 years under normal conditions. Exposure to moisture, physical impact, and temperature extremes can shorten that lifespan. If the sensors are original to a door system that is 15 or more years old, replacement is a reasonable preventive measure.
Q: Can I replace garage door sensors myself? A: Yes, for most standard residential systems. Replacement sensors for common brands like Chamberlain, LiftMaster, and Genie are available at hardware stores and online for $40 to $75 CAD. The installation involves disconnecting two wires, mounting the new bracket, and reconnecting the wires to the correct terminals.
Q: What if my garage door reverses only in cold weather? A: Cold temperatures cause metal brackets to contract slightly, which can shift sensor alignment just enough to break the beam. Check alignment in the fall and tighten all bracket hardware. Also check that no ice or snow has accumulated near the sensor base.
Q: Is there a way to test if my sensors are working correctly? A: Yes. With the door open, wave your hand through the beam path at floor level. The opener should prevent the door from closing or reverse it if it has started moving. Clopay’s sensor-alignment guide also recommends placing a 2×4 flat on the ground under the door and confirming the door reverses on contact.
Conclusion
A garage door that closes and then reopens is not a broken door; it is a safety system doing its job. The vast majority of these events trace back to one of four causes: misaligned sensors, dirty lenses, wiring faults, or sunlight interference. All four are diagnosable in under 30 minutes with basic tools.
Actionable next steps:
- Check both sensor LEDs right now. Solid means aligned; blinking or off means there is a problem to fix.
- Clean both lenses with a dry microfiber cloth before adjusting anything mechanical.
- Loosen, realign, and retighten the sensor bracket until the LED is solid.
- Follow the wiring from each sensor to the opener and look for pinches, staples, or loose terminals.
- If the sensors pass the bench test but the door still reverses, shift focus to mechanical causes: springs, tracks, and travel limits.
- Never bypass sensors as a permanent fix. If the problem persists after these steps, book a professional inspection.
For homeowners in the Oakville, Burlington, or Mississauga areas who need same-day help, Oakview Garage Doors offers garage door repair with same-day service. For a full mechanical checkup that includes sensor testing, spring inspection, and hardware adjustment, a professional garage door tune-up is the most cost-effective way to prevent future faults before they become emergencies.
References
- Chamberlain Group. “Safety Sensor Diagnostic Update.” Chamberlain Support. June 2026. https://www.chamberlain.com/support
- Chamberlain Group. “Safety Sensor Operation Clarification.” Chamberlain Support. April 2026. https://www.chamberlain.com/support
- Local Garage Doors. “11 Root Causes for Doors That Begin to Close and Then Reopen.” February 2026.
- Cunningham Door and Window. “5-Step Sensor Repair Guide.” March 2026.
- Lions Gate Garage Doors. “Photo-Eye Troubleshooting Guide.” February 2026.
- Clopay Building Products. “Garage Door Troubleshooting: Door Closes and Reopens.” https://www.clopaydoor.com/support
- Clopay Building Products. “Sensor Alignment Guide.” https://www.clopaydoor.com/support
- Quality Overhead Door. “Safety Sensor Troubleshooting.” 2025.
- Lee Company. “Garage Door Sensor Troubleshooting.” Late 2025. https://www.leecompany.com
- UL Solutions. “UL 325 Residential Garage Door Opener Safety Requirements.” 2024–2025 updates. https://www.ul.com